
Arena Setup
A step by step walkthrough of building an arena with the admin commands.
An arena is one runway path plus as many bases as you build, up to the bases.max-per-arena limit in Configuration (six by default). You place everything by standing where it should go and running a command. Every setup command needs the brainrot.admin permission and works on the arena you are editing, which is arena1 until you pick another. To build a second arena, see Rounds & Arenas.
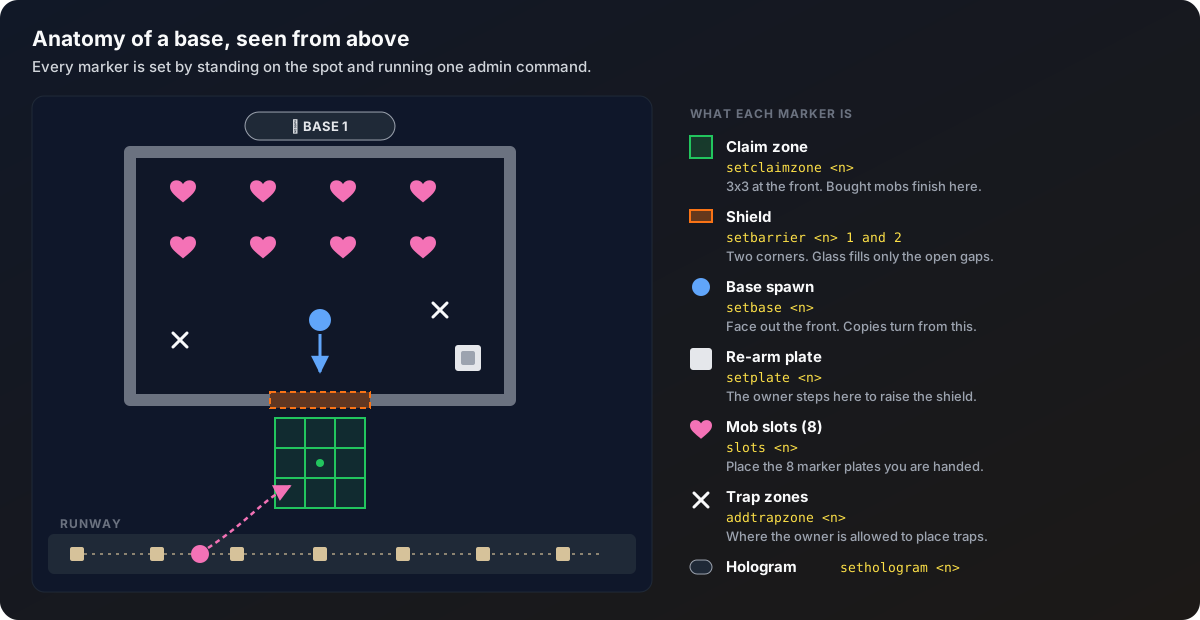
Everything you set is written to arenas.yml the moment you run the command. You can stop halfway and carry on another day.
Build order
Arena spawn and spectator lobby
Stand where players should appear when they join and run:
/brainrot admin setspawnThen stand where spectators should wait and run:
/brainrot admin setlobbyBuild base 1 by hand
Set up one base completely. Once it is right, you can copy it onto every other house instead of repeating all of this (next step).
/brainrot admin setbase 1The base spawn, where the owner appears when they claim it. Face out the front of the house when you run this. That direction is what copies turn from later.
/brainrot admin setclaimzone 1Stand on the block right in front of the house's opening, the spot a mob should walk to. The claim zone is the 3x3 around that block (bigger if you raise bases.claim-zone-radius). Bought mobs are secured here and stolen mobs are delivered here. Put it at the front: mobs walk to its center before they settle, so a claim zone at the back of the house makes them march through the middle.
A base can be claimed as soon as it has a spawn and a claim zone. Everything below makes it a proper base, but those two are the minimum.
/brainrot admin setbarrier 1 1
/brainrot admin setbarrier 1 2
Stand at two opposite corners of a box around the front of the house. That box is the shield. It only ever fills the empty blocks inside it with glass (doorways, windows, the front opening), so it is fine for the box to cover the whole front wall. Real walls are never touched.
/brainrot admin setplate 1Stand where the shield re-arm plate goes, then place any pressure plate on that block. Somewhere inside the base works best.
/brainrot admin slots 1Hands you one marker plate per mob slot: 8 by default, plus one for each level of the extra slots upgrade (11 in total with the default settings). Chat tells you which ones are the upgrade spots. Place each one where a secured mob should stand, and it counts up in chat as you go: 1/8, 2/8 and so on. Running it again wipes that base's slots and gives you a fresh set. Prefer typing? /brainrot admin addslot 1 adds one slot where you stand. If a base has no slots at all, mobs stand in a neat grid behind the base spawn.
/brainrot admin addtrapzone 1Run it a few times, standing on each block where the owner may place a trap.
/brainrot admin sethologram 1Optional. Moves the floating base label to where you stand. Without it, the label floats over the claim zone.
Copy it to the other houses
Walk to the next house, stand on the spot where its claim zone should go (right in front of its opening), look out its front, and run:
/brainrot admin copy 1 2Base 1's whole layout lands there, turned to match the way you are looking. Repeat for every house. Arena Tools has the full explanation with a picture.
To have more than six bases, raise bases.max-per-arena first. A base number is created the first time you set it up or copy onto it.
The runway path
The easy way, especially on a big map:
/brainrot admin setpath platesThis wipes the current runway and hands you 64 birch pressure plates. Walk the runway and place them in order, from where mobs should spawn to where they should leave. The first plate is the start, the last is the end, and every plate between is a waypoint.
Prefer typing? Stand at the spawn point and run setpath start, add a waypoint every few blocks with setpath add, and finish with setpath end. 10 to 20 points make a smooth path.
Preview it with a test mob:
/brainrot admin setpath testBought mobs walk home along these waypoints until they are close to their base, then step off into the claim zone. So route the runway through open ground that passes near every base. How close "close" is lives in mobs.base-approach-distance.
Check your work
/brainrot admin showDraws particles over everything you marked: green squares for claim zones, fire outlines for shields, a blue flame on each base spawn, hearts on slots, a white beam on each plate and crosses on trap zones. Run it again to switch it off. When you are happy, /brainrot admin plates hide takes the marker plates back out of the world.
Go live
/brainrot admin enableFrom now on /brainrot join puts players into the arena. /brainrot admin disable closes it again. The game itself starts once enough players are on bases, see Rounds & Arenas.
Path design tips
- Route the path close to every base so each player gets a fair shot at passing mobs.
- Longer paths (100 to 200 blocks) give more time to intercept, which means more fights.
- Narrow passages make choke points where the knockback stick shines.
- Slopes and steps are fine: mobs stay on the ground as the path goes up and down.
setpath listprints every waypoint,setpath clearstarts the path over.
Mistakes and changes
Re-run any command to overwrite that spot. For bigger changes (wiping a base, deleting a whole arena, reloading arenas.yml after editing it, clearing leftover holograms), see Arena Tools.